Unable to perform Remote Desktop Services installation – Unable to connect to the server by using Windows PowerShell remoting

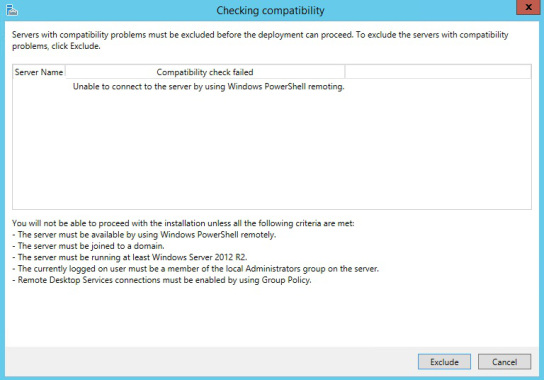
When starting an RDS farm install today I was presented with an error saying that the server could not be connected to via WinRM, which was odd as the server giving the error was the machine I was running the install from. A screenshot of the error is below;

rds_install_winrm_error

I did a little Googling of the problem and found a number of posts reporting this was related to IPv6 and that the fix or workaround was to disable IPv6. In my eyes this isn’t a workaround, Microsoft do advise against disabling IPv6. So, after a little more thinking about this, I wondered how the WinRM listeners were configured, and in particular the IPv6 listeners. Surprise, surprise, the IPv4 listeners were configured, but the IPv6 listeners simply were empty in Group Policy. An empty listener address range in policy means those listeners are disabled. Configuring these correctly in the policy and restarting the server then allowed the RDS installation to proceed.

Microsoft do give some detail on how to configure this setting and I just thought I’d share, as disabling IPv6 shouldn’t really be a fix for anything.

Server 2012, 2012 R2 & 2016 Disable Or Remove Deduplication On A Volume

Update – 11/11/2020: I’ve added a link here to Microsoft’s updated Server 2016 documentation that details deduplication – Understanding Data Deduplication

I just thought I’d post about this, as it’s something I’ve come up against recently, how to disable deduplication on a volume on Server 2012, 2012 R2 or 2016 and inflate the data back to it’s original form. In this example, the volume in question is E:

So let’s start with step one;
DO NOT DISABLE DEDUPLICATION ON THE VOLUME
If you disable dedup on the volume first, you simply stop new data being processed, rather than rehydrating your already deduplicated data.

So with that in mind the, step two would be to run the following command in PowerShell;
Start-DedupJob -Type Unoptimization -Volume E: -Full

When that job has completed, which you can check with the Get-DedupJob
command, you’ll then find that deduplication has been disabled on the disk. Since there’s still the garbage collection job to run, we need to rather counter-intuitively turn dedup back on for the volume with the following command Enable-DedupVolume -Volume E:

Once this is done, the next step is to run the following command to start your garbage collection on the volume;
Start-DedupJob -Type GarbageCollection -Volume E: -Full

Finally, after that, the final step is to turn off dedup on the volume with the following command;
Disable-DedupVolume -Volume E:

And that should save you any unnecessary drama.

Note
When all this is done, the volume will still show in some places like server manager sat at 0% deduplication rate, which is fine, as we’ve turned it off. I would guess this is just a bug, but it seems once a volume has been touched by the deduplication processes, it never goes back to a blank value for dedup rate.

Adding name servers to multiple DNS zones with PowerShell

I ran into a little problem today where I needed to add multiple DNS servers as name servers to multiple DNS zones all in one go. So this is essentially adding NS resource records to a zone, but doing it for multiple zones all at once. Yes I could have done them manually, but that’s boring and time consuming. So, here’s a quick one-liner that does the trick, obviously substitute in your DNS server and name server FQDNs in the correct places. If it fails for any reason it will continue on, but report the zone it failed on.

Get-DnsServerZone -ComputerName dnsserver.domain.com | where {$_.zonetype -eq "primary" -or $_.zonetype -eq "secondary"} | ForEach-Object {try {Add-DnsServerResourceRecord -ZoneName $_.zonename -ns -ComputerName dnsserver.domain.com -name $_.zonename -NameServer newdnsserver.domain.com -ea:stop} catch {"$_"}}

Hope someone finds that useful.